Basic Photo Theory and Digital Workflow (4 of 4)
Assuming that we have taken a number of photographs, which are saved on your camera's memory card, we now need to transfer our images onto our computer, to allow us to edit and tweak them until we are happy with a final result. This 'out of camera' adjustment stage is known as post-processing. The amount of adjustments we make are dependant on what file format we have shot in, what the final image use will be, and whether we want a 'true' photograph or create a piece of 'photoart' by applying various art effects.
Camera images can be transferred to your computer by either removing the memory card from your camera and placing it in a card reader or card slot connected to your computer, or by connecting a USB cable from your camera to your computer. Usually when you use a USB cable, your computer will automatically detect the camera, and autorun a file transfer program that is associated with your camera. eg with a Nikon camera, a connection will run Nikon Transfer, if installed.
Probably the safest method is to transfer your files to your computer via a USB cable, as this eliminates the need to remove and re-insert your camera's memory card, which could cause damage to the connections over time. Once your files have been transferred and checked, you can then Format the card IN CAMERA, using the Format function in the camera's menu system. It's important to do this on a regular basis, as it keeps your card's filing system clear and less likely to corrupt any files.
When trasferring your files to your computer, it is very important to have some sort of organised folder & file structure in place, as over a period of time, saving files to un-ordered random location can make finding and working on your files very frustrating. I tend to use folders created by year, and within them, folders by month, but another way to do it is to name folders by event... it's your call, but have 'some' sort of structure that suits you. It's also important to rename your images with logical titles, instead of keeping your camera's default naming system (eg DCM1012, DCM1013 etc). Far better to have FloridaSeaworld006 or SarahHat002. Most software now allows detailed searches, so you could find a whole group of related images by just searching for say... Florida or Sarah. It takes a bit of work initially to set up, but well worth the effort.
Before we get started with any post-processing, an important step to take is to look through all the images you've just transferred, and make a 'keep or delete' decison for each image. The beauty of digital photography is that you can take as many shots as there is space on your memory card, but you don't necessarily want to keep every one when you get home. You should therefore take some time to decide which 'less than perfect' shots to delete, only keeping the images you are satisfied with. Zooming in to check focus, or background detail & distractions often helps. Be careful though, I used to delete a lot of shots because I felt the lighting or exposure was too extreme to be usable. However since shooting in RAW, and especially since using Adobe Lightroom, I've found that many images that I would have previously deemed problematic, are now, with the amount of post-processing control available, quite worthwhile, and have actually produced some of my best images! So, yes, delete at this stage absolute 'no-hopers', but hold onto borderline poorly lit or exposed shots until you have tried a few tweaks later.
As mentioned in a previous chapter, if you have decided to shoot in RAW mode (and why wouldn't you?), there is an intermediate and important stage in the post-processing workflow required, where we adjust sharpness, exposure compensation, colour balance etc before saving the image in a standard file format (Tiff, Jpeg) for any further final work to the image in your graphics program.
If you load your RAW file directly into your graphics app, and it supports RAW, a dialog box should appear, allowing you to make any RAW tweaks to the image. In Adobe Photoshop (or Elements) for instance, the dialog that is used is known as ACR (Adobe Camera Raw), and acts as a 'go-between', converting the raw image data into a 'processed' format before passing it on to Photoshop for final editing, and saving as a Tif or Jpg file. Other apps have similar dialogs, whic detect you are trying to load a RAW file, and pop up a screen where you make your RAW tweaks as a seperate process, then carry on to do further editing. This is all very well, but harks back to a time when Photoshop (and other apps) were used less for photography and more for general digital artwork, and therefore was installed as an add-on when digital photography took off.
What was needed was a fully integrated program, which was designed specifically for digital photographers. Enter Adobe Lightroom! As I mentioned earlier, I now use this software for all my photographic work, and has now become the industry standard. I won't go into all the features and functions of Lightroom, as I have written an Introduction to Lightroom 5 which will give you a fuller insight into it's workings. However, it's worth mentioning some of the basic functions of the software to illustrate it's potential to the digital photographer.
Lightroom is an all-in-one package with a series of modules which each have a specific function handling each step of your digital post-processing. There is a Library module where all your images are organised and thumbnail images viewed, and 'metadata' edited. A most important Develop module, where all the real tweaking and adjustments are made to your RAW images. There are Print and Book modules, and many many more features such as automatic uploading (Publishing) images to online services like Facebook, Flickr etc. A very impressive and powerful program!
Central to Lightroom's use, is it's catalog. When you've transferred your images to your computer, you then import them into Lightroom's Catalog. This process doesn't actually copy your original into Lightroom to be overwritten. Your original file stays safe in it's original location. Lightroom creates thumbnail images within it's catalog, and it is these which are used on screen when you are working on an image. All the adjustments you make to an image in Lightroom are only made on an 'invisible' adjustment layer, and are saved as a set of values to a database file. It's only when you come to save (export) or print a final image, that Lightroom creates a completely new image by accessing the original image, and applies all the changes you've made, and then saves this new image to a new location, in the file format and size you selected. This whole process is known as 'non-destructive', as no changes are made to the original file.
As well as all the tweaks and adjustment that can be done by Lightroom, it allows images to be passed out (Edit In) to other external programs or filter suites for futher processing, which when completed, returns the image back to the lIghtroom catalog as an 'edited' copy. So all your photographic work is contained and available from one central and powerful application.
It's worth mentioning some of the more important adjustments that are required as part of your post-processing workflow. As discussed earlier, one of the main criteria of a 'good shot' is that it's exposure is correct. RAW allows the photographer make all sorts of adjustments, particulalry on exposure, and most software will have a set of sliders where you can adjust overall exposure, or make more narrow band adjustments with exposure, such as White, Highlights, Midtones, Shadows & Black. This ability to tweak certain areas of an image's exposure allows a huge flexiblity, allowing the photographer to 'shape' it's 'dynamic or tonal range'.
We can view an individual image's tonal range by viewing a graph of its 'brightness' (or Luminance to give it it's posh name)... we do this by looking at it's Histogram. A histogram is a graph of every pixel that makes up an image, and displayed as a greyscale, from black through midtones to white. Viewing this will confirm whether the image is too dark or light because of the distribution of the pixels that make up the shot. The good news is that poorly exposed images can be adjusted in port-processing to bring the histogram back to a more even spread of pixels, and thus a more even brightness.
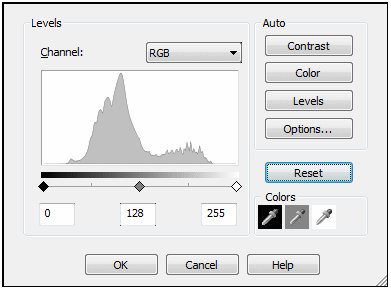
You can usually view an image histogram on your camera's LCD screen as soon as you've taken the shot (normally by selecting a toggle on the camera back). This allows the photographer to make any minor 'live' exposure changes to the shot if he sees the exposure isn't quite right. Actually, modern DSLRs are getting very good at capturing difficult lighting, and in most cases, if you are shooting in RAW, you can correct most exposure problems with your post-processing software. Digital application will always have the ability to also view an image's histogram graph, so you can see what remedial tweaks have to be made. These changes can be made using various controls in Lightroom, or by Levels & Curves adjustments in Photoshop and other software.
This is a major part of post-processing workflow, and histograms are an important element to understand and utilise. I've therefore written 'An Introduction to Histograms in Photography' for a fuller understanding.
Other important adjustments to make are checking for level horizons, cropping and removal of unwanted distractions.
A sloping horizon can be very distracting, but can be easily corrected using either a straighten/image rotate tool, or as in Lightroom, the crop tool, which has an angle adjustment tool. Image's will never look 'right' if a major horizontal or vertical element is off. the golden rule with this is that if any part of a natural horizon is visible, then is should be absolutely true, regardless of any other un-natural horizon or strong vertical. The human eye is conditioned to expect a level natural horizon. In adusting the angle of a horizon, you may find that your image has been croppped to accomodate the change.
Cropping, and knowing what and how much to crop, is a very important stage in the whole process, and can be as important as the original composition decisions made when taking the shot. Some images will not require any (or very little) cropping, depending on how well the original shot was composed in the viewfinder. Others may be OK images, but may require fine tuning to crop down the image to make a better composition, or through cropping, bring the subject into a Rule of Thirds position (as mentioned earlier). This can usually be checked during cropping as most programs allow a rule of thirds overlay grid to be shown when using the crop tool. It's often interesting spending some time considering different crops within an image, as various compositions can be had from a single image through different crops of the original. Another tip when taking shots is to allow a little bit of extra space around subjects, to allow for post-processing cropping options.
It's also worthwhile getting acquainted with the Clone & heal tools, as it allows you to remove or 'disguise' small distractions in your image, such as some debris or unwanted marks. This is a similar technique to the traditional 'spotting' work you would do on old prints, but allows a huge amount of extra sophistication, as you can copy material from one part of the image and blend it into another section to cover any blemishes. You can also tone down bright objects using partial opacity (as well as using contrast and darkening tools). Lightroom has a far higher level of sophistication, as it's Adjustment Tools allow not only cloning and healing, but local exposure, saturation and many more tweaks.
There are many, many artistic tools and procedures you can use to further enhance your images, or turn them into photo-artwork. However, the above details the basic steps required to process your photographs to a reasonably finalised state. It's up to you how much time and effort you are prepared to spend on each stage, to get the very best from your work. I hope the above and previous information proves useful as a template for your own digital workflow.
For more information on Adobe Lightroom, see my 'An Introduction to Lightroom 5'.
Post-Processing
Camera images can be transferred to your computer by either removing the memory card from your camera and placing it in a card reader or card slot connected to your computer, or by connecting a USB cable from your camera to your computer. Usually when you use a USB cable, your computer will automatically detect the camera, and autorun a file transfer program that is associated with your camera. eg with a Nikon camera, a connection will run Nikon Transfer, if installed.
Probably the safest method is to transfer your files to your computer via a USB cable, as this eliminates the need to remove and re-insert your camera's memory card, which could cause damage to the connections over time. Once your files have been transferred and checked, you can then Format the card IN CAMERA, using the Format function in the camera's menu system. It's important to do this on a regular basis, as it keeps your card's filing system clear and less likely to corrupt any files.
When trasferring your files to your computer, it is very important to have some sort of organised folder & file structure in place, as over a period of time, saving files to un-ordered random location can make finding and working on your files very frustrating. I tend to use folders created by year, and within them, folders by month, but another way to do it is to name folders by event... it's your call, but have 'some' sort of structure that suits you. It's also important to rename your images with logical titles, instead of keeping your camera's default naming system (eg DCM1012, DCM1013 etc). Far better to have FloridaSeaworld006 or SarahHat002. Most software now allows detailed searches, so you could find a whole group of related images by just searching for say... Florida or Sarah. It takes a bit of work initially to set up, but well worth the effort.
Before we get started with any post-processing, an important step to take is to look through all the images you've just transferred, and make a 'keep or delete' decison for each image. The beauty of digital photography is that you can take as many shots as there is space on your memory card, but you don't necessarily want to keep every one when you get home. You should therefore take some time to decide which 'less than perfect' shots to delete, only keeping the images you are satisfied with. Zooming in to check focus, or background detail & distractions often helps. Be careful though, I used to delete a lot of shots because I felt the lighting or exposure was too extreme to be usable. However since shooting in RAW, and especially since using Adobe Lightroom, I've found that many images that I would have previously deemed problematic, are now, with the amount of post-processing control available, quite worthwhile, and have actually produced some of my best images! So, yes, delete at this stage absolute 'no-hopers', but hold onto borderline poorly lit or exposed shots until you have tried a few tweaks later.
RAW Conversion
As mentioned in a previous chapter, if you have decided to shoot in RAW mode (and why wouldn't you?), there is an intermediate and important stage in the post-processing workflow required, where we adjust sharpness, exposure compensation, colour balance etc before saving the image in a standard file format (Tiff, Jpeg) for any further final work to the image in your graphics program.
If you load your RAW file directly into your graphics app, and it supports RAW, a dialog box should appear, allowing you to make any RAW tweaks to the image. In Adobe Photoshop (or Elements) for instance, the dialog that is used is known as ACR (Adobe Camera Raw), and acts as a 'go-between', converting the raw image data into a 'processed' format before passing it on to Photoshop for final editing, and saving as a Tif or Jpg file. Other apps have similar dialogs, whic detect you are trying to load a RAW file, and pop up a screen where you make your RAW tweaks as a seperate process, then carry on to do further editing. This is all very well, but harks back to a time when Photoshop (and other apps) were used less for photography and more for general digital artwork, and therefore was installed as an add-on when digital photography took off.
What was needed was a fully integrated program, which was designed specifically for digital photographers. Enter Adobe Lightroom! As I mentioned earlier, I now use this software for all my photographic work, and has now become the industry standard. I won't go into all the features and functions of Lightroom, as I have written an Introduction to Lightroom 5 which will give you a fuller insight into it's workings. However, it's worth mentioning some of the basic functions of the software to illustrate it's potential to the digital photographer.
Lightroom is an all-in-one package with a series of modules which each have a specific function handling each step of your digital post-processing. There is a Library module where all your images are organised and thumbnail images viewed, and 'metadata' edited. A most important Develop module, where all the real tweaking and adjustments are made to your RAW images. There are Print and Book modules, and many many more features such as automatic uploading (Publishing) images to online services like Facebook, Flickr etc. A very impressive and powerful program!
Central to Lightroom's use, is it's catalog. When you've transferred your images to your computer, you then import them into Lightroom's Catalog. This process doesn't actually copy your original into Lightroom to be overwritten. Your original file stays safe in it's original location. Lightroom creates thumbnail images within it's catalog, and it is these which are used on screen when you are working on an image. All the adjustments you make to an image in Lightroom are only made on an 'invisible' adjustment layer, and are saved as a set of values to a database file. It's only when you come to save (export) or print a final image, that Lightroom creates a completely new image by accessing the original image, and applies all the changes you've made, and then saves this new image to a new location, in the file format and size you selected. This whole process is known as 'non-destructive', as no changes are made to the original file.
As well as all the tweaks and adjustment that can be done by Lightroom, it allows images to be passed out (Edit In) to other external programs or filter suites for futher processing, which when completed, returns the image back to the lIghtroom catalog as an 'edited' copy. So all your photographic work is contained and available from one central and powerful application.
It's worth mentioning some of the more important adjustments that are required as part of your post-processing workflow. As discussed earlier, one of the main criteria of a 'good shot' is that it's exposure is correct. RAW allows the photographer make all sorts of adjustments, particulalry on exposure, and most software will have a set of sliders where you can adjust overall exposure, or make more narrow band adjustments with exposure, such as White, Highlights, Midtones, Shadows & Black. This ability to tweak certain areas of an image's exposure allows a huge flexiblity, allowing the photographer to 'shape' it's 'dynamic or tonal range'.
We can view an individual image's tonal range by viewing a graph of its 'brightness' (or Luminance to give it it's posh name)... we do this by looking at it's Histogram. A histogram is a graph of every pixel that makes up an image, and displayed as a greyscale, from black through midtones to white. Viewing this will confirm whether the image is too dark or light because of the distribution of the pixels that make up the shot. The good news is that poorly exposed images can be adjusted in port-processing to bring the histogram back to a more even spread of pixels, and thus a more even brightness.
You can usually view an image histogram on your camera's LCD screen as soon as you've taken the shot (normally by selecting a toggle on the camera back). This allows the photographer to make any minor 'live' exposure changes to the shot if he sees the exposure isn't quite right. Actually, modern DSLRs are getting very good at capturing difficult lighting, and in most cases, if you are shooting in RAW, you can correct most exposure problems with your post-processing software. Digital application will always have the ability to also view an image's histogram graph, so you can see what remedial tweaks have to be made. These changes can be made using various controls in Lightroom, or by Levels & Curves adjustments in Photoshop and other software.
This is a major part of post-processing workflow, and histograms are an important element to understand and utilise. I've therefore written 'An Introduction to Histograms in Photography' for a fuller understanding.
Other important adjustments to make are checking for level horizons, cropping and removal of unwanted distractions.
A sloping horizon can be very distracting, but can be easily corrected using either a straighten/image rotate tool, or as in Lightroom, the crop tool, which has an angle adjustment tool. Image's will never look 'right' if a major horizontal or vertical element is off. the golden rule with this is that if any part of a natural horizon is visible, then is should be absolutely true, regardless of any other un-natural horizon or strong vertical. The human eye is conditioned to expect a level natural horizon. In adusting the angle of a horizon, you may find that your image has been croppped to accomodate the change.
Cropping, and knowing what and how much to crop, is a very important stage in the whole process, and can be as important as the original composition decisions made when taking the shot. Some images will not require any (or very little) cropping, depending on how well the original shot was composed in the viewfinder. Others may be OK images, but may require fine tuning to crop down the image to make a better composition, or through cropping, bring the subject into a Rule of Thirds position (as mentioned earlier). This can usually be checked during cropping as most programs allow a rule of thirds overlay grid to be shown when using the crop tool. It's often interesting spending some time considering different crops within an image, as various compositions can be had from a single image through different crops of the original. Another tip when taking shots is to allow a little bit of extra space around subjects, to allow for post-processing cropping options.
It's also worthwhile getting acquainted with the Clone & heal tools, as it allows you to remove or 'disguise' small distractions in your image, such as some debris or unwanted marks. This is a similar technique to the traditional 'spotting' work you would do on old prints, but allows a huge amount of extra sophistication, as you can copy material from one part of the image and blend it into another section to cover any blemishes. You can also tone down bright objects using partial opacity (as well as using contrast and darkening tools). Lightroom has a far higher level of sophistication, as it's Adjustment Tools allow not only cloning and healing, but local exposure, saturation and many more tweaks.
There are many, many artistic tools and procedures you can use to further enhance your images, or turn them into photo-artwork. However, the above details the basic steps required to process your photographs to a reasonably finalised state. It's up to you how much time and effort you are prepared to spend on each stage, to get the very best from your work. I hope the above and previous information proves useful as a template for your own digital workflow.
For more information on Adobe Lightroom, see my 'An Introduction to Lightroom 5'.