Basic Photo Theory and Digital Workflow (1 of 4)
This is a very short introduction to the basic principles and techniques of digital SLR photography, and the workflow or 'post-processing' steps required, from taking your photograph, through to what tools to use in your digital darkroom.
This is by no means a definitive explanation of all things photographic, but merely a descriptive breakdown of how I approach the subject, my understanding of the basic principles and techniques, and the workflow method I use from deciding what shot to take, through to finishing off the final image. I intend this as a first introduction to digital SLR photography, so please excuse the simplistic approach if you are a seasoned photographer.
Taking a photograph involves setting your camera and lens to achieve the correct exposure and composition. Although most SLR cameras will calculate exposure automatically, within certain limits, they rely on the photographer to choose various modes and settings to determine how the exposure is attained, and how the final image will look.
There are 3 main elements which work together to achieve a correct exposure...
ISO Sensitivity
Shutter Speed
Lens Aperture
This is sometimes known as the Exposure Triangle.
The ISO setting traditionally was how a film's sensitivity, in a film camera, was measured. You generally used 100 or lower ISO film for outside shots and higher sensitivity film 400/800 or higher for inside or low light conditions. The lower the sensitivity of the film, the better and sharper the resolution of the final image, due to the finer chemical structure of the film. The problem with more sensitive higher ISO films was that the higher value, the grainier the image appeared, so it would be quite common to see, for instance, grainy indoor concert shots.
When digital came along, the new sensors were measured for light sensitivity, and the old ISO rating applied. Nowadays the base ISO setting for a digital SLR is typically 100 or 200 ISO, which if left at this lowest setting will again produce the highest resolution images from the camera.
Now that we've decided to leave the ISO setting at 100 (or 200) for the time being, the next choice we have to make is the 'Exposure Mode', ie how we want the camera to calculate the balance between shutter speed and lens aperture to get the correct exposure (it already knows the ISO sensitivity).
You usually have 4 main choices...
P - Program Mode
S - Shutter Priority
A - Aperture Priority
M - Manual Mode
Program Mode (P) is the simplest exposure mode to use. The camera decides automatically what combination of shutter speed and aperture to use, to achieve a correct exposure (based on the current ISO setting). Even in this mode though you can alter the shutter/aperture combination using one of the camera's command dials. So if you adjust the aperture setting, the program mode will automatically re-adjust the shutter speed to compensate and ensure the correct exposure is maintained.
Shutter Priority (S) is the exposure mode you would select for sport or action photography. This is because you would want to decide whether you want to freeze the action using a fast shutter speed, or to use a slower shutter speed to give a more blurred impression of speed. You select the shutter speed you want to give the effect you are after, and the camera will automatically adjust the lens aperture to ensure the correct exposure.
Aperture Priority (A) is the exposure mode that most photographers select, once you have mastered the basics and move away from Program Mode. The reason for this is that adjusting the lens aperture setting not only controls the amount of light passing through the lens, but also determines how much area around the subject is in focus. In this mode, you select the lens aperture you want to work with, and the camera automatically adjusts the shutter speed to ensure the correct exposure.
Note - When adjusting the lens aperture, the distance in front of and behind the subject that is in focus increases or decreases, depending on the aperture selected and the overall distance from the subject. This 'in focus' range is known as the Depth of Field (see below) and is quite important to understand, to get the best from your photographs, and add creativity.
Manual Mode (A) is the exposure mode that experienced photographers prefer. This mode gives you total control over both shutter and aperture settings. This is usually achieved by an exposure display in the viewfinder, which has a pointer which moves over and under a central perfect exposure point. You can adjust the pointer to this zero point by adjusting shutter speed and/or aperture (and also ISO) using a combination of command dials. Although this is named Manual Mode, it is still a camera derived exposure, as most photographers try to achieve the exposure display (although this can be compensated).
Let's assume you have focused on someone standing a little distance away from you, and your lens aperture is set at f8. There will be an area around the person which is in focus. This is the depth of field (DOF) zone. In front of that, and behind it will be out of focus. When you focus on something, as a rule of thumb, the DOF (the area which is sharp) is 1/3 in front of the focal point, and 2/3 behind it. The actual DOF distance in feet or metres around the subject depends on 3 things... the distance you are from the focal point, the focal length of the lens (18mm, 50mm, 200mm etc), and more importantly the aperture of the lens.
So, in Aperture Priority mode, when setting up your shot, you have to decide how much of the scene you want in focus and either adjust the distance you are away from the subject, and what aperture to select. This is the bit to remember...
Select a small aperture (high f number eg.. f16, f22) if you want as much as possible to be in focus. This would be useful for landscapes or photographs of people you want to see in their environment or surroundings.
Select a large aperture (low f number eg... f1.8, f4) if you want to limit the amount that is in focus. This would be useful for isolating your subject from their (possibly distracting) background, close-ups, or in low light conditions.
Be aware though, that when a lens aperture is large or fully open, image quality can display some edge distortions or other aberrations. How much depends on the quality of the lens.
Obviously, whilst in Aperture Priority mode, as you are adjusting the aperture setting to get the DOF effect you are after, the camera will be adjusting the shutter speed accordingly to maintain exposure. You have to keep a wary eye on this shutter speed figure, as you may get to the point where the shutter speed is too low, and would cause camera shake if used. So a compromise may have to be made between desired aperture and achievable shutter speed to give stability. Adjusting the ISO setting can also help tweak up the shutter speed for a given aperture, as these three main controls all work together to attain perfect exposure.
How do you know how low to go in shutter speed before it might cause camera shake? Well, there is a golden rule that the shutter speed should not drop below the focal length of the lens in use. So if you were using a 50mm lens say, you wouldn't want the shutter speed to drop below 1/50th second. Ensuring a shutter speed therefore of 1/60 or above should allow hand holding your camera with this lens. On a 18-200mm zoom lens for instance you would look at the longest focal length of that zoom lens (200mm) and try to keep your shutter speed above that, so, to be on the safe side, try to keep your shutter speed 1/200th or greater.
There are therefore a few choices you can make if your shutter speed is too low for the aperture you have selected...
1) Use a wider aperture (lower f number), which will automatically raise the shutter speed.
2) Use a tripod. You'll be able to use much slower shutter speeds with a tripod.
3) Increase your ISO setting. Increasing ISO sensitivity will mean you will be able to use the same aperture setting, but because the sensitivity has been increased, the shutter speed required will be quicker. Try ISO 400 or 800 at first. More extreme ISO speed will result in an increase of image noise.
Also, some modern lenses now have 'lens stabilisation' built in, which gives the user extra flexibility before camera shake is an issue, but it is still worthwhile monitoring your settings with this in mind.
There are some circumstances where very low light at normal settings will not allow any kind of acceptable exposure. In these instances the only workaround is by using a flash or by increasing your camera's ISO sensitivity. A flash will allow you to work in extremely dark locations, but can cause colour and contrast problems. The other solution is to increase your ISO setting significantly (800-3200) which should allow workable shutter speeds with a range of apertures, but will increase image noise. This can be acceptable and used creatively or removed in post processing with a noise removal filter.
This is by no means a definitive explanation of all things photographic, but merely a descriptive breakdown of how I approach the subject, my understanding of the basic principles and techniques, and the workflow method I use from deciding what shot to take, through to finishing off the final image. I intend this as a first introduction to digital SLR photography, so please excuse the simplistic approach if you are a seasoned photographer.
Understanding Exposure
Taking a photograph involves setting your camera and lens to achieve the correct exposure and composition. Although most SLR cameras will calculate exposure automatically, within certain limits, they rely on the photographer to choose various modes and settings to determine how the exposure is attained, and how the final image will look.
There are 3 main elements which work together to achieve a correct exposure...
ISO Sensitivity
Shutter Speed
Lens Aperture
This is sometimes known as the Exposure Triangle.
ISO
The ISO setting traditionally was how a film's sensitivity, in a film camera, was measured. You generally used 100 or lower ISO film for outside shots and higher sensitivity film 400/800 or higher for inside or low light conditions. The lower the sensitivity of the film, the better and sharper the resolution of the final image, due to the finer chemical structure of the film. The problem with more sensitive higher ISO films was that the higher value, the grainier the image appeared, so it would be quite common to see, for instance, grainy indoor concert shots.
When digital came along, the new sensors were measured for light sensitivity, and the old ISO rating applied. Nowadays the base ISO setting for a digital SLR is typically 100 or 200 ISO, which if left at this lowest setting will again produce the highest resolution images from the camera.
Exposure Mode
Now that we've decided to leave the ISO setting at 100 (or 200) for the time being, the next choice we have to make is the 'Exposure Mode', ie how we want the camera to calculate the balance between shutter speed and lens aperture to get the correct exposure (it already knows the ISO sensitivity).
You usually have 4 main choices...
P - Program Mode
S - Shutter Priority
A - Aperture Priority
M - Manual Mode
Program Mode (P) is the simplest exposure mode to use. The camera decides automatically what combination of shutter speed and aperture to use, to achieve a correct exposure (based on the current ISO setting). Even in this mode though you can alter the shutter/aperture combination using one of the camera's command dials. So if you adjust the aperture setting, the program mode will automatically re-adjust the shutter speed to compensate and ensure the correct exposure is maintained.
Shutter Priority (S) is the exposure mode you would select for sport or action photography. This is because you would want to decide whether you want to freeze the action using a fast shutter speed, or to use a slower shutter speed to give a more blurred impression of speed. You select the shutter speed you want to give the effect you are after, and the camera will automatically adjust the lens aperture to ensure the correct exposure.
Aperture Priority (A) is the exposure mode that most photographers select, once you have mastered the basics and move away from Program Mode. The reason for this is that adjusting the lens aperture setting not only controls the amount of light passing through the lens, but also determines how much area around the subject is in focus. In this mode, you select the lens aperture you want to work with, and the camera automatically adjusts the shutter speed to ensure the correct exposure.
Note - When adjusting the lens aperture, the distance in front of and behind the subject that is in focus increases or decreases, depending on the aperture selected and the overall distance from the subject. This 'in focus' range is known as the Depth of Field (see below) and is quite important to understand, to get the best from your photographs, and add creativity.
Manual Mode (A) is the exposure mode that experienced photographers prefer. This mode gives you total control over both shutter and aperture settings. This is usually achieved by an exposure display in the viewfinder, which has a pointer which moves over and under a central perfect exposure point. You can adjust the pointer to this zero point by adjusting shutter speed and/or aperture (and also ISO) using a combination of command dials. Although this is named Manual Mode, it is still a camera derived exposure, as most photographers try to achieve the exposure display (although this can be compensated).
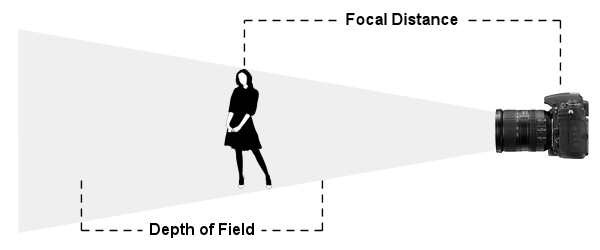
Depth of Field
Let's assume you have focused on someone standing a little distance away from you, and your lens aperture is set at f8. There will be an area around the person which is in focus. This is the depth of field (DOF) zone. In front of that, and behind it will be out of focus. When you focus on something, as a rule of thumb, the DOF (the area which is sharp) is 1/3 in front of the focal point, and 2/3 behind it. The actual DOF distance in feet or metres around the subject depends on 3 things... the distance you are from the focal point, the focal length of the lens (18mm, 50mm, 200mm etc), and more importantly the aperture of the lens.
So, in Aperture Priority mode, when setting up your shot, you have to decide how much of the scene you want in focus and either adjust the distance you are away from the subject, and what aperture to select. This is the bit to remember...
Select a small aperture (high f number eg.. f16, f22) if you want as much as possible to be in focus. This would be useful for landscapes or photographs of people you want to see in their environment or surroundings.
Select a large aperture (low f number eg... f1.8, f4) if you want to limit the amount that is in focus. This would be useful for isolating your subject from their (possibly distracting) background, close-ups, or in low light conditions.
Be aware though, that when a lens aperture is large or fully open, image quality can display some edge distortions or other aberrations. How much depends on the quality of the lens.
Obviously, whilst in Aperture Priority mode, as you are adjusting the aperture setting to get the DOF effect you are after, the camera will be adjusting the shutter speed accordingly to maintain exposure. You have to keep a wary eye on this shutter speed figure, as you may get to the point where the shutter speed is too low, and would cause camera shake if used. So a compromise may have to be made between desired aperture and achievable shutter speed to give stability. Adjusting the ISO setting can also help tweak up the shutter speed for a given aperture, as these three main controls all work together to attain perfect exposure.
Aperture vs Shutter Speed vs Camera Shake
How do you know how low to go in shutter speed before it might cause camera shake? Well, there is a golden rule that the shutter speed should not drop below the focal length of the lens in use. So if you were using a 50mm lens say, you wouldn't want the shutter speed to drop below 1/50th second. Ensuring a shutter speed therefore of 1/60 or above should allow hand holding your camera with this lens. On a 18-200mm zoom lens for instance you would look at the longest focal length of that zoom lens (200mm) and try to keep your shutter speed above that, so, to be on the safe side, try to keep your shutter speed 1/200th or greater.
There are therefore a few choices you can make if your shutter speed is too low for the aperture you have selected...
1) Use a wider aperture (lower f number), which will automatically raise the shutter speed.
2) Use a tripod. You'll be able to use much slower shutter speeds with a tripod.
3) Increase your ISO setting. Increasing ISO sensitivity will mean you will be able to use the same aperture setting, but because the sensitivity has been increased, the shutter speed required will be quicker. Try ISO 400 or 800 at first. More extreme ISO speed will result in an increase of image noise.
Also, some modern lenses now have 'lens stabilisation' built in, which gives the user extra flexibility before camera shake is an issue, but it is still worthwhile monitoring your settings with this in mind.
There are some circumstances where very low light at normal settings will not allow any kind of acceptable exposure. In these instances the only workaround is by using a flash or by increasing your camera's ISO sensitivity. A flash will allow you to work in extremely dark locations, but can cause colour and contrast problems. The other solution is to increase your ISO setting significantly (800-3200) which should allow workable shutter speeds with a range of apertures, but will increase image noise. This can be acceptable and used creatively or removed in post processing with a noise removal filter.